WELCOME

 Chicky
Current mood: Hypnotized (otherwise Happy)
Current action: Watching Ultraman Mebius & Ultraman Brothers again
 Porky
Porky
Current mood: Uncertain
Current action: Watching the movie with Chicky
A quick snapshot.

Current mood: Hypnotized (otherwise Happy)
Current action: Watching Ultraman Mebius & Ultraman Brothers again
 Porky
PorkyCurrent mood: Uncertain
Current action: Watching the movie with Chicky
A quick snapshot.
P1 W1MAX called to apologize and will try to remedy the problem as soon as possible. They will also waive two months off bill for compensation. Well, we applied the P1 during the last PC Fair in KL Convention Centre (somewhere is March) and until today they haven't send us any billing.
Anyway, my boys came down with a slight flu and myself as well so I didn't manage to make much time for blogging. So, while I was preparing the pics for upload I heard a loud crash.
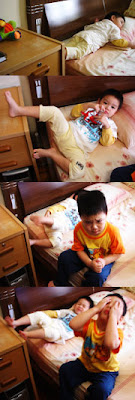 (Porky lying restlessly)
(Porky nibbling on the Ultraman)
(Grumpy Chicky)
(Chicky and Porky camera shy)
 (Ultraman Mebius & Ultraman Brothers on tv)
(Chicky becoming Ultraman)
(Chicky is flying)
(Window breaks) *gasp*
I'm in so much trouble right now. Before I could figure out what causes the noise, Chicky already sprint out of the room. He must be doing his somersault thingy and his feet landed on the two layer of glasses.
There's gonna be hell when Dolzer comes back (he hates mosquitoes at night). After cleaning up the broken glasses with the maid, I continued with blogging.
I was experimenting with gif animation the other day and it was a SUCCESS (shown at the very top post).
I use:
Instruction
Creating the Art
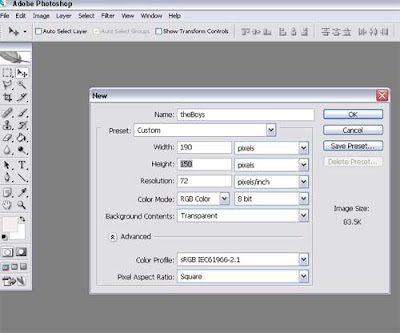
Open Adobe Photoshop. Create image file size 190 x 150. Set resolution 72 pixels per inch and mode to RGB.
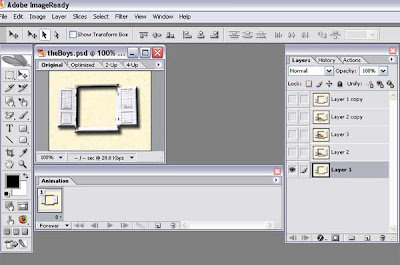
Choose Layers from the WINDOW menu (at the top bar) to bring up the Layers floating palette. I duplicate 2 more layers and rename them Layer 2 and Layer 3. The images are prepared using the Polygonal Lasso Tool where I crop and position them accordingly.
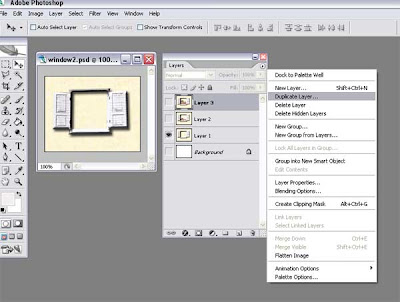
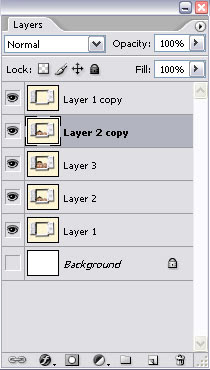
There are 5 layers in total. Layer 1 and 2 are duplicated and arranged as shown below.
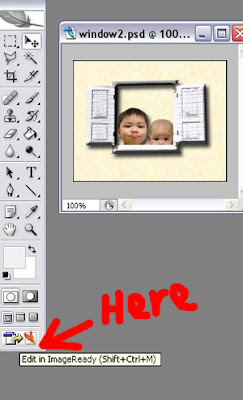
Under file menu, select EDIT IN IMAGEREADY. Save when prompted.
Animating in ImageReady
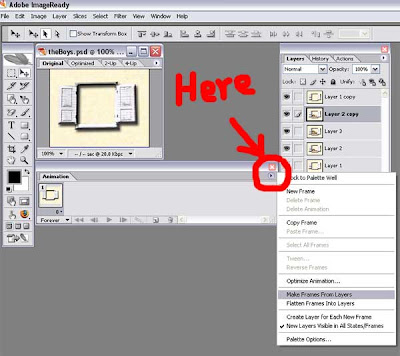
Choose SHOW ANIMATION from WINDOW menu to bring up the Animation floating palette.
Click on Animation palette's submenu arrow and select MAKE FRAMES from LAYERS.
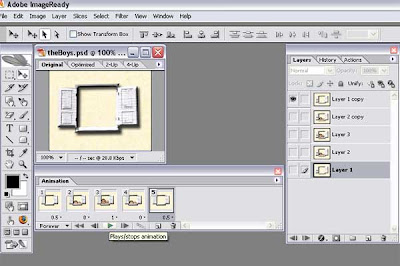
Add timeline effect (right click at the bottom of each frame e.g. 1s delay/0.5s delay) and animate by pressing the PLAYS/STOPS button until perfect.
Go to FILE > SAVE OPTIMIZED AS to save the animation under a new name.
Upload to PHOTOBUCKET
If upload directly using the Blogger photo icon, the *.gif file will not be animated.

Therefore, I upload it with the free Photobucket image host and use the HTML to display the animated image.

 Original HTML from Photobucket
 Edited HTML
*Tadaa...*
note: According to my maid, after Chicky broke the glass he ran downstairs, out of the house, put on his shoes while calling the maid:
Chicky: Kaem Lang!!! Come!!! Let's go!!!
Such nerve!
I use:
- Adobe Photoshop CS2
- Image Ready
Instruction
Creating the Art
Open Adobe Photoshop. Create image file size 190 x 150. Set resolution 72 pixels per inch and mode to RGB.

Choose Layers from the WINDOW menu (at the top bar) to bring up the Layers floating palette. I duplicate 2 more layers and rename them Layer 2 and Layer 3. The images are prepared using the Polygonal Lasso Tool where I crop and position them accordingly.

There are 5 layers in total. Layer 1 and 2 are duplicated and arranged as shown below.

Under file menu, select EDIT IN IMAGEREADY. Save when prompted.

Animating in ImageReady
Choose SHOW ANIMATION from WINDOW menu to bring up the Animation floating palette.

Click on Animation palette's submenu arrow and select MAKE FRAMES from LAYERS.

Add timeline effect (right click at the bottom of each frame e.g. 1s delay/0.5s delay) and animate by pressing the PLAYS/STOPS button until perfect.

Go to FILE > SAVE OPTIMIZED AS to save the animation under a new name.
Upload to PHOTOBUCKET
If upload directly using the Blogger photo icon, the *.gif file will not be animated.

Therefore, I upload it with the free Photobucket image host and use the HTML to display the animated image.

I re-edit the HTML after copy-paste into the Blogger's EDIT HTML tab. Note that the given hyperlink (starting with
 Original HTML from Photobucket
 Edited HTML*Tadaa...*
By clicking on the animated image will not open the Photobucket site but it is underlined with no links. I'm still learning how to just link it to the image but I'll save if for another day. I guess that's about it. Phew, I'm exhausted now.
Chicky: Kaem Lang!!! Come!!! Let's go!!!
Such nerve!


No comments:
Post a Comment